How to Fill Out an I-9 Form by Section [+ Video Instructions]
Need Help Hiring?
Get Your Free Hiring Ebook With Downloadable Templates
Charlette has over 10 years of experience in accounting and finance and 2 years of partnering with HR leaders on freelance projects. She uses this extensive experience to answer your questions about payroll.
Jennifer Soper is an HR Specialist and staff writer for Fit Small Business, with over 15 years of experience in accounting, payroll, and human resources.
This article is part of a larger series on Hiring.
Employers are required to complete an I-9 form, which confirms eligibility to work in the US, within three days after a new employee is hired. The employee fills out the first page, and employers must verify and fill out the rest. Follow the instructions by section to complete your I-9 forms correctly.
Begin by downloading the current I-9 form, which is free and available in English and Spanish, during the onboarding of your new hire. You can choose to use the fillable PDF or print and give paper copies to your new hires.
NOTE: Employers should continue using Form I-9, Employment Eligibility Verification, after its expiration date of Oct. 31, 2022, until further notice. DHS will publish a Federal Register notice to announce the new version of Form I-9 once it becomes available in early 2023.
Section 1: Employee Information and Attestation
Section 1 of the I-9 form should be completed in full by the employee. If any of the fields are not relevant (such as your employee has no email address), they can write “N/A” in the field.
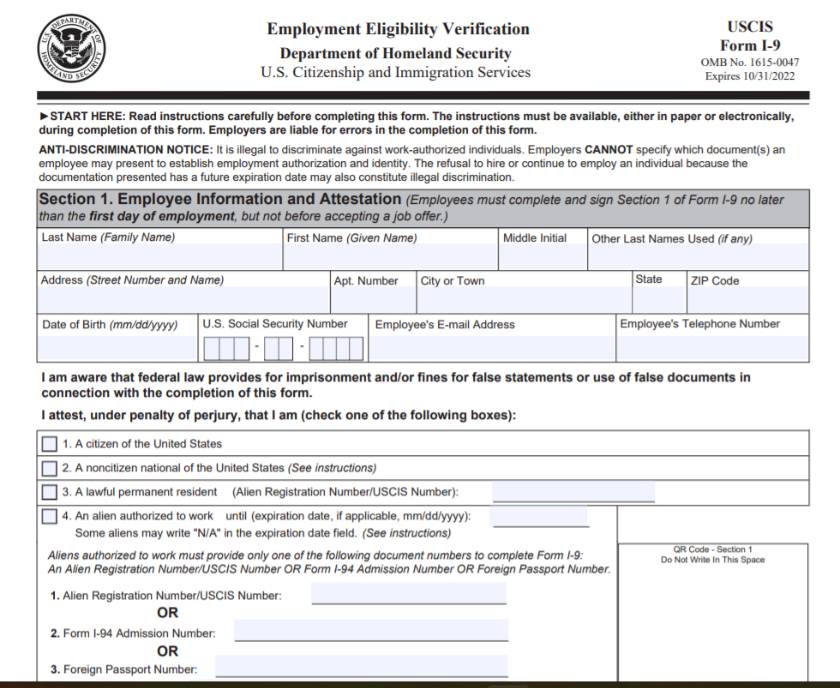
Employee Information
The first part of Section 1 is to provide the employee’s information. Have the employee input their
- Name
- Address
- Date of birth
- Social Security number
- Telephone number
- Email address (if applicable)
Employee information box
Some employees have non-standard names, such as hyphenated last names or no middle initial. Other employees may not have received their Social Security numbers yet. There are instructions provided in the Handbook for Employers for these unique situations.
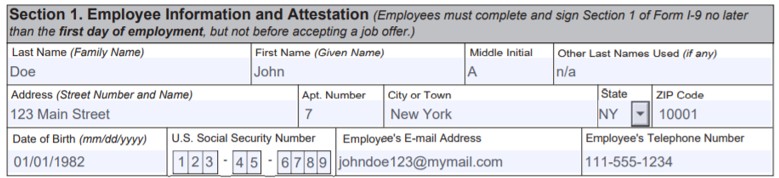
Attestation
The second part of Section 1 attests (under penalty of perjury) that the employee is eligible to work in the United States. The employee should check the appropriate box:
- A citizen of the United States
- A noncitizen national of the United States
- A lawful permanent resident
- An alien authorized to work
Employee attestation data
The employee should then sign and date the form, where indicated.
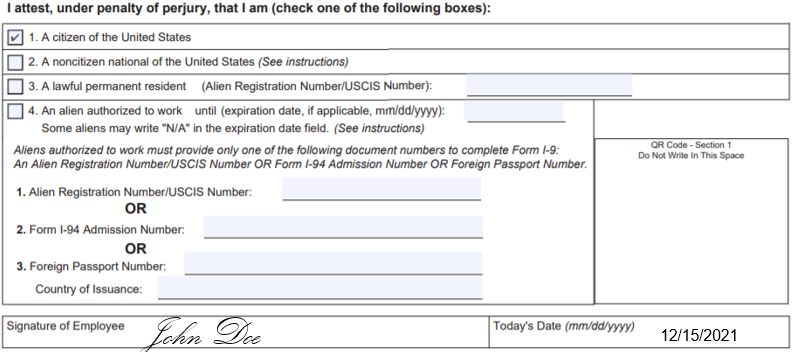
Preparer and/or Translator Certification
The employee must state whether they used a preparer/translator or not. Have the employee check the corresponding box:
- I did not use a preparer or translator
- A preparer(s) or translator(s) assisted the employee in completing Section 1
If a translator was used, then that person (which may be you, another employee, or the employee’s family member) will need to complete and sign the section where indicated.
Preparer or translator will sign and complete their name and address information.
If you’re using a payroll provider, look for the I-9 and other employment forms on its website. Software like Gusto can email I-9 forms to employees with instructions on completing the form and tools to sign and submit the forms electronically.
Section 2: Employer or Authorized Representative Review and Verification
The employer completes this section. In a small business, the authorized representative may be your administrative assistant or accounting/payroll manager. Start by copying the employee’s name and enter it into the first box that states Employee Info from Section 1.

Employee information from Section 1
In the Citizenship/Immigration Status box, input the number corresponding to their employee status, as indicated in Section 1:
- A citizen of the United States
- A noncitizen national of the United States
- A lawful permanent resident
- An alien authorized to work
For example, if the employee is a citizen of the United States, you would input #1 in the Citizenship/Immigration Status box.
Identity and Employment Authorization
To complete this portion of the I-9 form, have the employee bring in two forms of identification (must be examined in person). Examples of acceptable documents can be found in our I-9 form article.
To prevent employment discrimination, don’t tell the employee which documents to bring. Provide them with the instructions, asking them to bring documentation per the I-9 form to prove that they’re legally eligible to work in the US.
Using the document(s) provided by the employee, the employer representative will complete the Identity and Employment Authorization sections (List A or Lists B and C). Fill in the following fields:
- Document Title (i.e., US Passport)
- Issuing Authority
- Document Number
- Expiration Date
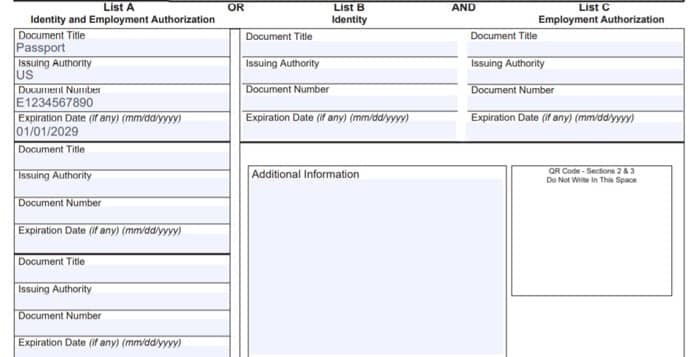
Identity and Employment Authorization sections
Once you’ve seen the original documents yourself (or had your representative verify them), and you’ve noted the document title, issuing authority, document number, and expiration date on the I-9 form, hand the documents back to the employee. There’s no need for you to keep photocopies.
If the employee is unable to present the required documents from list A, or from lists B and C combined, you have one of two options.
- If the employee doesn’t yet have their documentation, a receipt showing that they’ve applied for these documents will suffice. You will be required to come back and complete Section 3 of the form once the documents arrive.
- You can rescind the employment offer and terminate their employment. Make this expectation clear from day one by showing them the text at the top of Section 2, which states: “Employers must sign and complete Section 2 within three business days of the employee’s first day of employment.”
It is a best practice to accept the documentation provided as long as it appears to be genuine and related to the employee. However, if the document is not original, or the name or image has been manipulated, you may ask the employee to provide you with an original document that has not been altered.
Start Date and Authorized Signature
After you have completed List A or Lists B and C, you will enter the employee’s start date. This is the date the new hire began work with your company. The employer or authorized representative will then sign the document. Include the following:
- Title of employer or authorized representative
- Last name of employer or authorized representative
- First name of employer or authorized representative
- Business or organization name
- Business or organization address
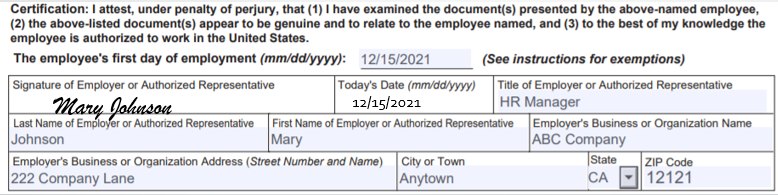
Input employee’s start date and sign.
Section 3: Reverification and Rehires
Section 3 is used only to review documentation that was applied for but not yet received at the time of hire or reverify documents when an employee is rehired. Similar to Section 2, you (or your representative) will sign that you have reviewed/reverified the document once the employee brings it in. You do not need to fill out a new form—simply add the following to the existing I-9:
- Part A: Fill in the employee’s name if it includes a name change that is different from Section 1 of the form (i.e., marriage and divorce with a name change).
- Part B: Fill in the new hire date.
- Part C: Used to establish new (or previously expired) documentation different from that in Section 2 of the I-9 form. Enter the document title, number, and expiration date.
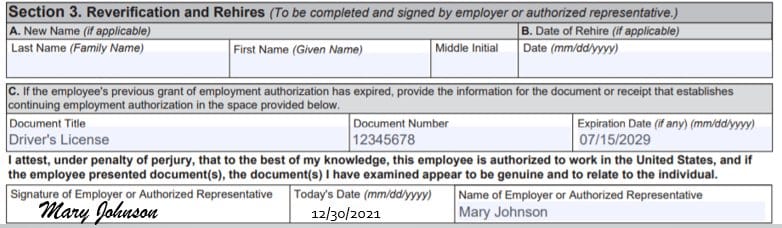
Input date of rehire or verification documentation.
An I-9 is needed only when you hire an employee who will be paid wages and receive a year-end W-2. You do not need an I-9 form if you’re hiring a contract employee who you’ll pay through your accounting system and issue a 1099-MISC at year-end. Contractors need only an independent contractor agreement.
Verify the I-9 Form Is Completed Correctly & File
To verify that the I-9 form is completed, make sure all required fields are filled out (or marked “unknown” or “N/A,” as required), signature fields are completed, and dates are input in the correct format of mm/dd/yyyy (example: 07/03/2022).
Another option to verify employment eligibility is to use the E-Verify system. E-Verify is a government internet website that allows you to verify that the information the employee listed on the I-9 form is valid. Whereas completing an I-9 form is required, using E-Verify is not required for most employers. However, it can give you peace of mind if you want to ensure your employees are legally eligible to work in the US.
Where to File I-9 Forms
Once documents are signed and verified, create an electronic or paper file folder called I-9s and store them by year. As a best practice, do not store signed I-9 forms in employees’ personnel folders due to the confidential information they contain. Use a checklist in each employee’s personnel file to indicate that you have completed the I-9 form and have it on file. Of note, the I-9 does not need to be sent to an authorizing authority but simply kept on file within your business.
When to Delete I-9 Forms
Completed and signed I-9 forms need only be kept for three years after the time of hire. A best practice is to destroy (shred) I-9 documentation after three years. If an employee is terminated, their I-9 form can be destroyed after one year. An audit of your records can result in fines (up to $10,000), but records aren’t usually levied against a business unless a pattern of violations is seen.
For more on what documents to keep and how long to keep them, read our payroll records retention article.
Frequently Asked Questions
Can I fill out an I-9 for myself?
No. Employees cannot act as their own authorized representative. Each employee must fill out the employee section of the I-9 form and the employer should complete and sign the employer section.
In the case of an employee, such as HR, acting as the authorized representative for employees when signing I-9 forms, this person should have someone else in the company review, verify, complete and sign their individual I-9 form.
What happens if I don’t fill out an I-9?
If an employee does not complete their I-9 form within three days of hire, you have the right to refuse work and/or terminate their employment. However, you cannot withhold payment for work completed even for an employee who has not filled out the I-9 form and is facing termination.
Although the I-9 form does not have to be returned to the IRS, it is a requirement to keep one on file for each employee. Not having I-9 forms filled out could result in a penalty if your business is audited.
Does the address on your I-9 matter?
Your employees should enter their current physical address (that matches their identification) on the I-9 form when they first fill it out. After that, there is no requirement to keep I-9 forms updated when employees change their names or addresses. The primary purpose of the I-9 is to verify eligibility for employment in the United States. Once that has been verified, there is no need to update the form unless the eligibility status changes.
Bottom Line
I-9 verification is an employer requirement that must be completed within three days of your new hire’s start date. You must complete sections 1, 2, and 3 and verify documentation in person for each new hire. While the I-9 does not need to be sent to anyone, you should keep the document in a separate file from the new hire’s personnel folder.